A DICOM Query/Retrieve operation retrieves images from remote DICOM servers in order to store them locally. After the images have been received, they can be loaded and processed independently of the remote server.
Configurations for DICOM Query/Retrieve (Q/R)
There are some prerequisites for using DICOM Q/R with PMOD:
1.Locally in PMOD, the DICOM server must be configured and running because it receives the images sent from the remote system. The PMOD DICOM server configuration is explained above.
2.Locally in PMOD, the remote DICOM systems from which images should be retrieved must be defined. Because they will send images to the PMOD DICOM server, they are configured as DICOM client nodes as described above.
3.The PMOD DICOM server must be configured on the remote DICOM system by its administrator. Otherwise these systems will most likely reject the association request from PMOD, so that no images can be queried.
Retrieving Images per DICOM Query/Retrieve
The DICOM Q/R function can be called from
•the Menu in the PVIEW tool, or
•using the Q/R button on the DB Load page in any of the PMOD tools.
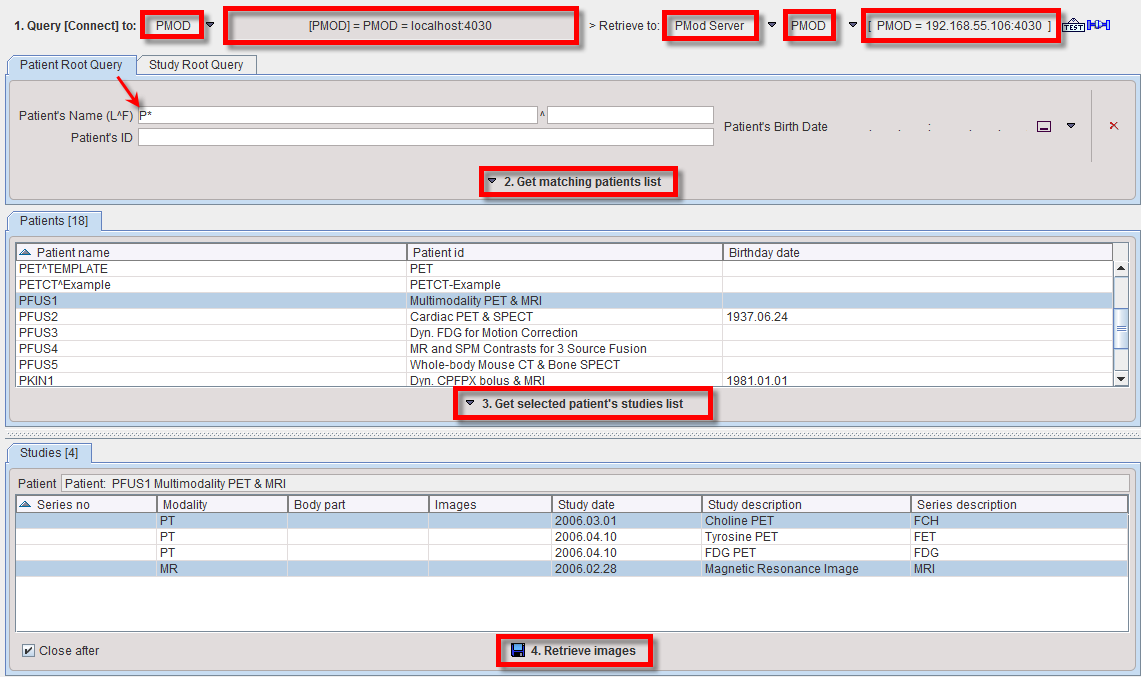
The dialog window shown below appears which allows the user to query and retrieve studies.

The following steps need to be performed:
1.Query [Connect] to: The selection lists all DICOM systems which have been configured as DICOM Clients. The connection is established as soon as the selection is activated..
2.Retrieve to: Typically, one would like to retrieve to the local DICOM server as shown in the example, but with External node it is also possible to select any of the configured DICOM clients (which must be a DICOM server) as the destination. Once the server is selected (configure, then activate), the connection can be tested with ![]() .
.
3.Select the query mode, Patient Root Query or Study Root Query by the tab. Note that some servers may not support both modes. If the query is not supported, Get matching patients list remains grey.
4.Get matching patients list: The purpose of this step is to get a list of studies, from which the ones of interest are retrieved. To avoid excessive numbers of matches some filter fields are available. In the example above, only patients with names starting with "P" are queried. When Get matching patients list is activated, the query is sent to the remote system, the response is received and the matching patients are listed.
5.Get selected patients studies list: Only studies from one patient can be retrieved at a time. Therefore a patient must be selected in the Patients list, and then the Get selected patient's studies list button activated. As a result, the remote system is asked for all studies of the selected patient, and the result is listed.
6.Retrieve images: To retrieve some of the studies select them in the Studies list (CTRL+Click), and then activate the Retrieve images button. A request is submitted to the remote system, which will send the requested images to the Retrieve to DICOM server. If the Close after box is checked, the dialog window will be closed while the receive process is going on in the background and will show a notification once the transfer completed. Otherwise, the dialog window remains open until the transfer completes.
Note: It depends on the configuration of the receiving DICOM server, where the images are saved, and thus from where they can be loaded. The default of the local PMOD DICOM server is saving the images in the Pmod database.